Organize all the fields in a form: grouping each set of fields onto a "tab"
so the user can switch between the sets in whichever order they wish
The basic idea
Here's what to build:
Views for the contents of each tab
Table with shading to give the visual effect of tabs
Buttons for each tab with a rule that switches the view
The clever way to organize a view is described in detail in this article:
http://blogs.msdn.com/infopath/archive/2006/05/01/tabs.aspx
Also for the vertical tabs refer the following article:
http://www.infopathdev.com/blogs/mel_balsamo/archive/2009/09/06/create-an-infopath-form-that-switches-views.aspx
Friday, March 5, 2010
Tuesday, March 2, 2010
The Contact Selector Control in infopath
The Contact Selector control is an ActiveX control but it is a special cased control, in that it can also be used in InfoPath browser forms. To use this control there are specific steps that need to be taken – let’s take a look at those now.
Step 1: Add the Contact Selector control to your Controls Task Pane
1) From the Controls Task Pane click the Add or Remove Custom Controls link
2) Click the Add button
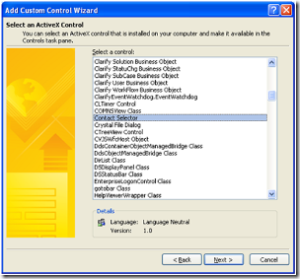
3) On the first screen of the Add Custom Control Wizard select ActiveX control and click Next
4) From the list of controls, choose Contact Selector and click Next
5) Select “Don’t include a .cab file” and click Next
6) For Binding Property select Value and click Next
7) From the Field or group type box choose Field or group (any data type) and click Finish
8) Click Close and then click OK
Step 2: Create the data structure for the Contact Selector Control
The Contact Selector control needs to have a specific data structure to work properly – this is documented on the “Items” tab of the Properties screen for the control; however, we’ll include that information here as well.
**IMPORTANT!** Spelling and capitalization must be exactly the same, starting with the “Person” group!
1) Add a non-Repeating Group named: gpContactSelector
2) Add a Repeating Group named: Person
3) Add the following 3 text fields to the Person group: DisplayName, AccountId and AccountType
Step 3: Add and bind the Contact Selector control to the View
1) Drag the gpContactSelector Group to the View and select “Contact Selector” from the list of controls
2) You’re almost done…! :-)
Step 4: Add a secondary data source XML file which specifies the SharePoint server
The Contact Selector control needs to know the “context” of where the user validation should occur. These steps are not necessary if you are only displaying the form in a browser from SharePoint – in this case, it uses the context of the site from where it was provisioned; however, if you are in a mixed client/browser scenario you will need to include this XML file so forms opened in the client can use this functionality.
1) Launch Notepad
2) Copy and paste this one-line XML:
**NOTE: Replace with the name of your server and also remove the comments
3) Save this as: Context.xml (again – naming and capitalization are important)
4) Add Context.xml as a “Receive” type Secondary Data Connection to your form template and make sure the option “Include the data as a resource file” is enabled
Step 5: Test!
You should now be able to Preview the form, enter a name or logon alias, click the “Check Names” button and resolve the name! Alternatively you could click the “To” button to perform a Search if you do not know the complete name of the user.
One other important point: if this control is something you will use numerous times, this process works great to create a “Contact Selector Template Part” – then you only have to complete these steps one time!
refered from this link.
href="http://blogs.msdn.com/infopath/archive/2007/02/28/using-the-contact-selector-control.aspx"
Step 1: Add the Contact Selector control to your Controls Task Pane
1) From the Controls Task Pane click the Add or Remove Custom Controls link
2) Click the Add button
3) On the first screen of the Add Custom Control Wizard select ActiveX control and click Next
4) From the list of controls, choose Contact Selector and click Next

5) Select “Don’t include a .cab file” and click Next
6) For Binding Property select Value and click Next
7) From the Field or group type box choose Field or group (any data type) and click Finish
8) Click Close and then click OK
Step 2: Create the data structure for the Contact Selector Control
The Contact Selector control needs to have a specific data structure to work properly – this is documented on the “Items” tab of the Properties screen for the control; however, we’ll include that information here as well.
**IMPORTANT!** Spelling and capitalization must be exactly the same, starting with the “Person” group!
1) Add a non-Repeating Group named: gpContactSelector
2) Add a Repeating Group named: Person
3) Add the following 3 text fields to the Person group: DisplayName, AccountId and AccountType
Step 3: Add and bind the Contact Selector control to the View
1) Drag the gpContactSelector Group to the View and select “Contact Selector” from the list of controls
2) You’re almost done…! :-)
Step 4: Add a secondary data source XML file which specifies the SharePoint server
The Contact Selector control needs to know the “context” of where the user validation should occur. These steps are not necessary if you are only displaying the form in a browser from SharePoint – in this case, it uses the context of the site from where it was provisioned; however, if you are in a mixed client/browser scenario you will need to include this XML file so forms opened in the client can use this functionality.
1) Launch Notepad
2) Copy and paste this one-line XML:
**NOTE: Replace
3) Save this as: Context.xml (again – naming and capitalization are important)
4) Add Context.xml as a “Receive” type Secondary Data Connection to your form template and make sure the option “Include the data as a resource file” is enabled
Step 5: Test!
You should now be able to Preview the form, enter a name or logon alias, click the “Check Names” button and resolve the name! Alternatively you could click the “To” button to perform a Search if you do not know the complete name of the user.
One other important point: if this control is something you will use numerous times, this process works great to create a “Contact Selector Template Part” – then you only have to complete these steps one time!
refered from this link.
href="http://blogs.msdn.com/infopath/archive/2007/02/28/using-the-contact-selector-control.aspx"
Custom web service code to find out whether a user belongs to perticular group
Add Following code in web service and publish this web service, it has two parameters that needs to be passed
1) employee login : should be in the form DomainName\username
2) Group name : which is group name you have created in sharepoint site.
Add web reference to http:///_vti_bin/usergroup.asmx.
Also put your server name where I have indicated below
[WebMethod]
public String IsMOSSUserGroup(String employeeUserName, String group)
{
try
{
ServerName.UserGroup objWebService = new ServerName.UserGroup();
objWebService.Credentials = System.Net.CredentialCache.DefaultCredentials;
System.Xml.XmlNode ndGroups = objWebService.GetGroupCollectionFromUser(employeeUserName);
Boolean blnFound = false;
String strGroup = group;
foreach (System.Xml.XmlNode xmlGroup in ndGroups.ChildNodes[0].ChildNodes)
{
if (strGroup == xmlGroup.Attributes["Name"].Value)
{
blnFound = true;
}
}
if (blnFound == true)
{
return "Yes";
}
else
{
return "No";
}
}
catch (Exception ex)
{
return ex.Message;
}
}
This web service will return Yes if the given user belongs to the given sharepoint group.
1) employee login : should be in the form DomainName\username
2) Group name : which is group name you have created in sharepoint site.
Add web reference to http://
Also put your server name where I have indicated below
[WebMethod]
public String IsMOSSUserGroup(String employeeUserName, String group)
{
try
{
ServerName.UserGroup objWebService = new ServerName.UserGroup();
objWebService.Credentials = System.Net.CredentialCache.DefaultCredentials;
System.Xml.XmlNode ndGroups = objWebService.GetGroupCollectionFromUser(employeeUserName);
Boolean blnFound = false;
String strGroup = group;
foreach (System.Xml.XmlNode xmlGroup in ndGroups.ChildNodes[0].ChildNodes)
{
if (strGroup == xmlGroup.Attributes["Name"].Value)
{
blnFound = true;
}
}
if (blnFound == true)
{
return "Yes";
}
else
{
return "No";
}
}
catch (Exception ex)
{
return ex.Message;
}
}
This web service will return Yes if the given user belongs to the given sharepoint group.
Auto increment number of repeating section infopath
If you have created the repeating section or table in your infopath form and want to index it with the auto increment number to the each row or section then here is the easiest way to do it without taking any coding efforts..
1. Open your infopath form.
2. Add an column named is Sr. No.in your repeating table/section.
3. Add a textbox control in the column.
4. Right click on textbox say Textbox Properties.
5. Simply add the following formula to the Default Value field,
count(../preceding-sibling::*[local-name() = "YourRepeatingGroupName"])
6. Replace "YourRepeatingGroupName" with your own repeating group name.
7. Say ok to all save and preview it!!
8. It will work like viola!!!!!!!!!!!!!!!!!
Subscribe to:
Posts (Atom)